Total Pageviews

Follow Me on Pinterest

Friday, March 30, 2012

Our Winner of the Big Bite Crop-A-Dile is..........

Hey Bloggers,
We have a surprise today!  I said if you commented on the Blog Post yesterday you could win a prize.  
Well the prize is a brand new CROP-A-DILE BIG BITE, and the winner is: Samantha Ivy!


So Samantha, please email me at jewelrymkr@gmail.com, and give me your phone number.  
I will call you and arrange to get your brand new Crop-a-Dile Big Bite to you right away!


Congratulations!
I'll post again later today, so check back to see what else I have in store.  TGIF!


Happy Crafting!
ReNae

Wednesday, March 28, 2012

Ribbon Dispenser Box Day 2, It's Finished!

Hey Bloggers!
I am happy to say that I have new batteries in my camera, and I have finished the Ribbon Dispenser Box.
This project is really fun!  I love using the Crop-a-dile Big Bite and plan on making about three more of these Ribbon Dispenser Boxes!
We left off yesterday when I had just punched the holes in the sides of the shoe box.  Using the 3/18" setting, I punched 10 holes on the two long sides of the shoe box.  I then selected some eyelets, but right then my camera batteries died, so I had to stop for the night.  The box didn't look the way I had envisioned it, so I decided to spruce up the box by changing the color of the eyelets.  
I selected a lime green and used both small and medium sized eyelets.  I loved the way it looked!

I alternated sizes of the green eyelets and it made the box look prettier!
There are many colors and styles of eyelets available, as you can see by just the ones on my desk.
This photo is a bit blurry, sorry.  It is showing how I attached the eyelet to the shoe box.  
Align your eyelet puncher right into the hole you punched and press firmly.
It will make the nicest eyelet you will ever see!
Here you can see that I put the ribbon spools inside of the box, on to the dowels.
The dowels are 3/18" x 12 ". 
 There are 10 eyelet holes but more than 10 ribbon spools on each side.    
I learned something important here...
 Next time I make this Ribbon Box, I am going to first place my ribbon inside the box and see how many ribbon spools fit.  That number will determine how many holes I punch.  Regarding dowel rods:  Purchase a dowel rod that is 3/18" as this size matches the largest punch on the BIG BITE. 
It also is a perfect fit for the little wooden balls that I put on the ends.  
The wooden balls give the box a more finished look that if you just left them uncovered.
These wooden balls are available at Michael's in the jewelry department. ($2.99)
The dowel rods are in the section that sells wood crafts.  (.29 each rod)
In this photo I wanted to illustrate that some ribbon spools may be too wide for the eyelet 
holes you punched.  These holes are only 3/18" so 1/2 " ribbon is about as wide 
as you can go--maybe 5/8" but not much more.  
For your wider ribbon spools,  punch larger holes and use larger eyelets.  


The Ribbon Dispenser Box fits nicely into my storage area, and blends with the other boxes!
If I need a ribbon for a project, I simply pull out what I need from the box, no need to dig through scads of ribbon inside a box, never knowing what I have because I can't see what I have!
 
Here is the finished project!  I think it turned out great!  The cost was under $5.00  and we accomplished two things today.  We organized our ribbon and we used our BIG BITE!

Gorgeous!

If you have any questions about this project, please post a comment and I'll tell you what I know!
I had a blast making this box.  I'll put the step-by-step instructions in tomorrow's blog.  But for tonight I just wanted you to see these photos!  Try it!  It's inexpensive and it's fun! *I have since painted the little balls green to match the eyelets.  It made the box look very nice and completed the project!

NOW!  About the giveaway!  Leave me a comment telling me what you think of this project.  I appreciate all your comments, ideas, and input so don't hold back!  I will pick a winner at random tomorrow and winner will be announced tomorrow (Thursday) evening at 9 p.m.

Artistry LTD Stamp Club meeting at Ink Paper Rubber Thursday evening at 6 p.m.  This is a free club and everyone is welcome.  The challenge this month is a layout challenge.  Mary Kay is in charge of the demo... a three dimensional shoe that would make a great treat or small gift holder for Easter.  Please bring these supplies:  Patterned paper (12" x 12" double sided or 2 coordinating sheets in 12" x 12".)  Adhesive, Mary Kay recommends wet adhesive like Zip glue.. a strong dry adhesive such as red line tape will also work.
Well that's all for tonight!
Please don't forget to COMMENT!
 Just click on the word Comment at the end of this post, and it will open up a comment window.
If you have trouble, email me at jewelrymkr@gmail.com and let me know!

Happy Crafting!
ReNae

Tuesday, March 27, 2012

Let's Make A Ribbon Dispenser Box!


Hi Bloggers!
Sorry this is a day late!  I am feeling much better now so this evening I began the project we talked about yesterday, the Ribbon Dispenser Box.  As I discussed yesterday, we have several tools in our craft room that we rarely use, and for me, one of them is the Big Bite! I have had this tool for 2 years and have used it only one time before today!
The Ribbon Dispenser Box is a fun way to use the Big Bite.  And I like this little tool! I really like the way it punches.  It's easy and it was not a struggle to punch the shoebox!  I think what was most challenging was having the confidence to just get it out of the box and use the dang thing!
SADLY, Right at the end of the project, the batteries in my camera died!  So I'm going to post the photos now, then go get batteries, and finish the post when I get back.
Go ahead and "read" the pictures, you should be able to at least get an idea of how it's done.  I'll post all the dimensions and size of the dowels, etc. when I get back.  So you will be able to make one of your own tomorrow!
I do want to tell you-I spent a small fortune on ribbon organizers from one of the Big Box Craft Stores, and I simply didn't need to.  I could have just made a couple of these!  They work great!  And they are easy to make!  Cost-wise, you only have the cost of the box, (under $5) and the dowel, (29 cents each)

So without further adieu, here are the photos.  I'll see you back here very soon to tell you more!
In the meantime, Happy Crafting!
ReNae


Do you store ribbon like this?  I do!
When you want to get some ribbon, you end up having to dump everything out just to find one ribbon!
And that makes a big mess!  Ugh!
Want to organize this mess?  How about making a Ribbon Dispenser Box?
All you need is a BIG BITE, a shoe box, a dowel, glue and your RIBBON!
First, just measure the box from top to bottom.
Then you measure it side to side.  Decide where you want the holes to be... 
On my shoebox, I measured so that there would be one hole every inch.
Then I took a light colored sharpie, and put a small mark where I wanted the punch hole to be.
Measure with this guide how far down you want to punch.  
This is a close up of the guide.
It slides up and down so  you can adjust it exactly where you want it.
The first time I set the guide, I set it wrong.  Make sure you understand that the hole puncher is behind the  eyelet setter.  If you can, practice it on a separate piece of cardboard,  just to be sure of the placement.
Look closely, see the little nub, that is not the puncher.  The hole puncher is  behind that nub.
It's flat against the shoebox.  I punched it thinking that the nub was the puncher, and had to re-do it.
 
Here is what your box will look like with eyelets and ribbon.
However, I am going to do mine a little differently.
Unfortunately, right after I took this photo my camera batteries died.

So as soon as I go get some more batteries, I'll be back to post the final steps.
I hope you can kind of get how it's done so far.
I'll explain the placement of the dowels, and how everything comes together  in my next post.
See you all soon!
RENAE

Monday, March 26, 2012

Get Ready for a fun week!

Hi Bloggers!
Just a quick post to give you the supplies we will need for our Monday evening project!
In our first lesson, we are going to be learning about the Big Bite by WE R Memory Keepers.
If you are like me, this is a tool I just had to have, and once purchased, it sat on the shelf unused collecting dust!  Let's change that right now!

The Big Bite by We R Memory Keepers
There are several videos available describing the Big Bite, and here are my two favorites:
(just click on the word for the video to appear)
1. Joy's Video 
2. Scrapbook Dot Com's Video
Joy, from www.joyslife.com has a wonderful website.  She also has a dynamic YouTube presence.
In Joy's video, she describes both the Crop-A-Dile and the Big Bite,  gives a demo, and shares some great ideas for projects using them.
Speaking of projects, for our Monday(now postponed to Tuesday) night project, we are going to be making a Ribbon Dispenser Box, much like the one seen in Joy's video, The supplies you will need are as follows:

  • A Shoe Box with a lid (available at Jo-Ann's or Michael's if you don't have one at home)
  • 2 small dowels, 1 inch longer than the length of your shoe box.  (In other words, if you are using a child's shoe box, your dowels will be shorter than those you would use if you are planning to use a women's shoe box...)
  • Glue (suitable for adhering the dowels to the box).  Elmer's Wood glue works great!
  • Big Bite 
  • 20-30 eyelets (optional but preferred)
  • acrylic paint and/or decorative paper to decorate your shoe box
  • your personal stash of ribbons, still on the spools. 
*NOTE: Depending on the width of the ribbon spools, your ribbon dispenser box will hold from 20 to 30 spools. Choose eyelets that will accommodate the width of your ribbon. 
So to prepare for our Monday night lesson, Please view these 2 videos. put all these supplies together and I'll have the Monday lesson posted by 5 p.m.
Note!!  Class postponed due to illness, see "comments" section!
Remember, we have giveaway$ all week, so tell your friend$!  You will be rewarded for referral$!
$ee you then!
ReNae 
COMMENTS?  To leave a comment click on the word " __Comments" below.  A box will appear and once you leave your comment, click the word "Publish" and that's it!  Click for updates on Ribbon Box Tutorial scheduled for Monday evening...Click on "comments" for update!  Thank you!


Friday, March 23, 2012

New Contest for Spring!

Hi Bloggers!
Since Spring is practically here, I decided to have a "Spring Cleaning" Contest!  
Put on your aprons, we're gonna make art!
We're going to dust off some of those supplies that we have in our craft room that we just had to have at the time, but somehow rarely use!  If you're like me, you may sometimes get in a rut.  We use the same 3 supplies in all our projects, rarely looking outside the proverbial "box".
You know what I'm talking about!  That Crop-a-dile and i-Topper, the Cinch machine, and specialty Punches and Dies.  Paint dabbers and alcohol inks, (dye inks and pigment inks too) Embossing folders and embossing powders, the Sew Easy tool, and that Melting pot too!  I personally have a Your Story and Cricut machine that I forget I have! 

So, in the interest of "Springing ahead" and "Spring Cleaning" I decided to come up with one project per day next week, using some of those rarely used but really cool tools I just mentioned.
PLUS, if there is something in YOUR craft room collecting dust, and you want me to come up with a project for it, leave a comment below, and I'll try my best to do so.
We will start on Monday March 26th and continue through the week.  One prize will be awarded each day for those who participate or leave comments!  So, check back tomorrow for details and information about the contest and the prizes! 
I will also be giving referral bonus prizes to those who tell their friends about my blog.  I'm trying to get a community of crafty people together in one spot, where we can share our love of crafting, and share ideas as well.  So if you refer a friend, just let me know in the comments section below each day's post.

So!  You have 2 days to get ready!  I will post a supply list each evening for the next day's project.  My hope is that you won't have to buy anything new to do any of the projects, just use what you already have.  And don't forget to make suggestions for projects you'd like to see on the blog!  I welcome your input!  Check back here often to get updates, and we will start the contest on Monday!

NOTE:  There is some confusion as to how to leave a comment on my blog postings.  
At the end of each post, there is the word "comments" which is a hot link.  When you click on it, a little box will appear, where you you will see the words, "Post a comment".  Then after you type in your comment, select "publish".  You do not have to be a follower of my blog to leave a comment, however I hope you do sign up!  
To sign up, scroll to the END of the entire page, and click on where you see the words, CREATIVE FRIENDS.  Or, click on "Join this site".  Either way should work.  See you Monday!

Saturday, March 17, 2012

and the WINNER IS...

Hi Bloggers!
We have a winner!  The recipient of the $50 Tim Holtz prize package is (drum roll...)
KAT FIFE  
(aka WizardsKat.)  She participated in all 5 days of the contest, and even wrote this sweet comment:
"You have a great site!  This weeks game has me back to card making like a crazy person. So much fun!!! Thanks!!!!!  Today's word if GREEN and the phrase is LUCK OF THE IRISH.  I'm also known as WizardsKat. have a great day ReNae!!!!"
Kat won a tim Holtz ATC sized Components stamp, a pkg. of  Tim Holtz Philosophy Tags,  a pkg. of Tim Holtz Alpha Parts Letters, a Visual Artistry Stamp set from Stamper's Anonymous, and a pkg. of Swivel Clasps from Tim Holtz.
Kat, Please email me @ jewelrymkr@gmail.com with your mailing address 
and I will send the prizes to you! 
You have 24 hours to claim your prize.  
If prize is not claimed, another winner will be chosen! 
Thanks everyone for playing!
Tonight was Artistry Unleashed Club at Ink Paper Rubber, and we all had a great time with Gia!
Please come back under the "Crab Tree" tomorrow where I'll have full coverage of the fun event complete with photos and all the information you need to do these techniques in your  home studio.

In the meantime, 
Happy Crafting!   

THE LUCK OF THE IRISH TO YOU!  
HAPPY ST. PATRICK'S DAY!

ReNae

Friday, March 16, 2012

Day 5 Luck o' the Irish / What is UTEE?

Hi Bloggers!
Today is the final day of the Luck o' the Irish Contest.  Today I will be giving you TWO words to unscramble.  One is a bonus word, in case you missed a day this week, you can make it up!

But first, we are going to discuss UTEE.  
If you have never heard of UTEE, it stands for Ultra Thick Embossing Enamel.  UTEE is very versatile and can be used in a variety of ways.  Like other embossing powders, the granules are heated up to form a shiny enameled surface.
Ultra Thick Embossing Powder (UTEE)
With UTEE you can:
  1. highlight a stamped image 
  2. stamp into it while it's still warm to create 3-dimensional embellishments 
  3. coat a project 
  4. pour it into molds to make an embellishment 
  5. sprinkle it onto a project, then heat it up to create a unique texture or surface
  6. Use it to create a "cracked glass" effect  
UTEE is heated by using a heat gun, a toaster oven or melted into a hot plate called a "Melting Pot" and is part of the Melting Pot & Accessory Line, developed by artist Suze Weinberg.  The one advantage to using a toaster oven is that the granules won't blow around as much if using a heat gun.  Depending on the project each way of heating UTEE has it's advantages. The finished UTEE can be cut with a craft scissors, and can also be cracked and inked to give a crackle effect.  (see video below)

I had the pleasure of taking two classes by Ms. Weinberg last year, and I learned just how much fun using UTEE can be!  We made a plaque where we used various techniques using UTEE, then put them all together on the plaque. 
As shown on this plaque, we used at least 6 techniques using UTEE.

From top clockwise, we poured UTEE into a frame, poured it into a mold, framed a glass slide with it, stamped on it, sprinkled it on the surface for texture,  poured into a cookie cutter and embossed with it,  just on the one plaque!

I have compiled a list of videos here showing various uses of UTEE and invite you to try it out!
You will have a lot of fun using this product, and it will add so much to the project you are making!

First to get you familiar with the Melting Pot click Melting Pot Video 
Next, to see several more UTEE and Melting Pot Art Products click HERE!
Then, to see some jewelry made by artist Racho113 using UTEE, click HERE!
Finally, to see a more advanced technique using UTEE, watch "Ink Stained Roni" Here!
I hope you have enjoyed learning about UTEE.  I will be teaching some UTEE classes soon so check back soon for dates and times!
NOW FOR OUR WORD OF THE DAY... Unscramble this word "NREGE"
*And if you missed any day this week, here is the BONUS PHRASE..."KLCU FO EHT SRIHI!"
TO WIN~
Sign up to be one of my "Creative Friends". Go to the bottom of this blog, and click on "Join this site".  Then leave a comment and your answer unscrambling the word in the "Post a Comment" box at the end of this post.  Be sure to check back Saturday to see if you won as winner will be announced first thing Saturday morning.  
The winner has 24 hours to email me to claim the prize.  
If I do not hear from you by Sunday morning at 9 am a new winner will be chosen.  
In the event of a tie, a random winner will be determined by number at Random. org.
Everyone has a chance to win, so please make sure you have an entry on each blog post this week!
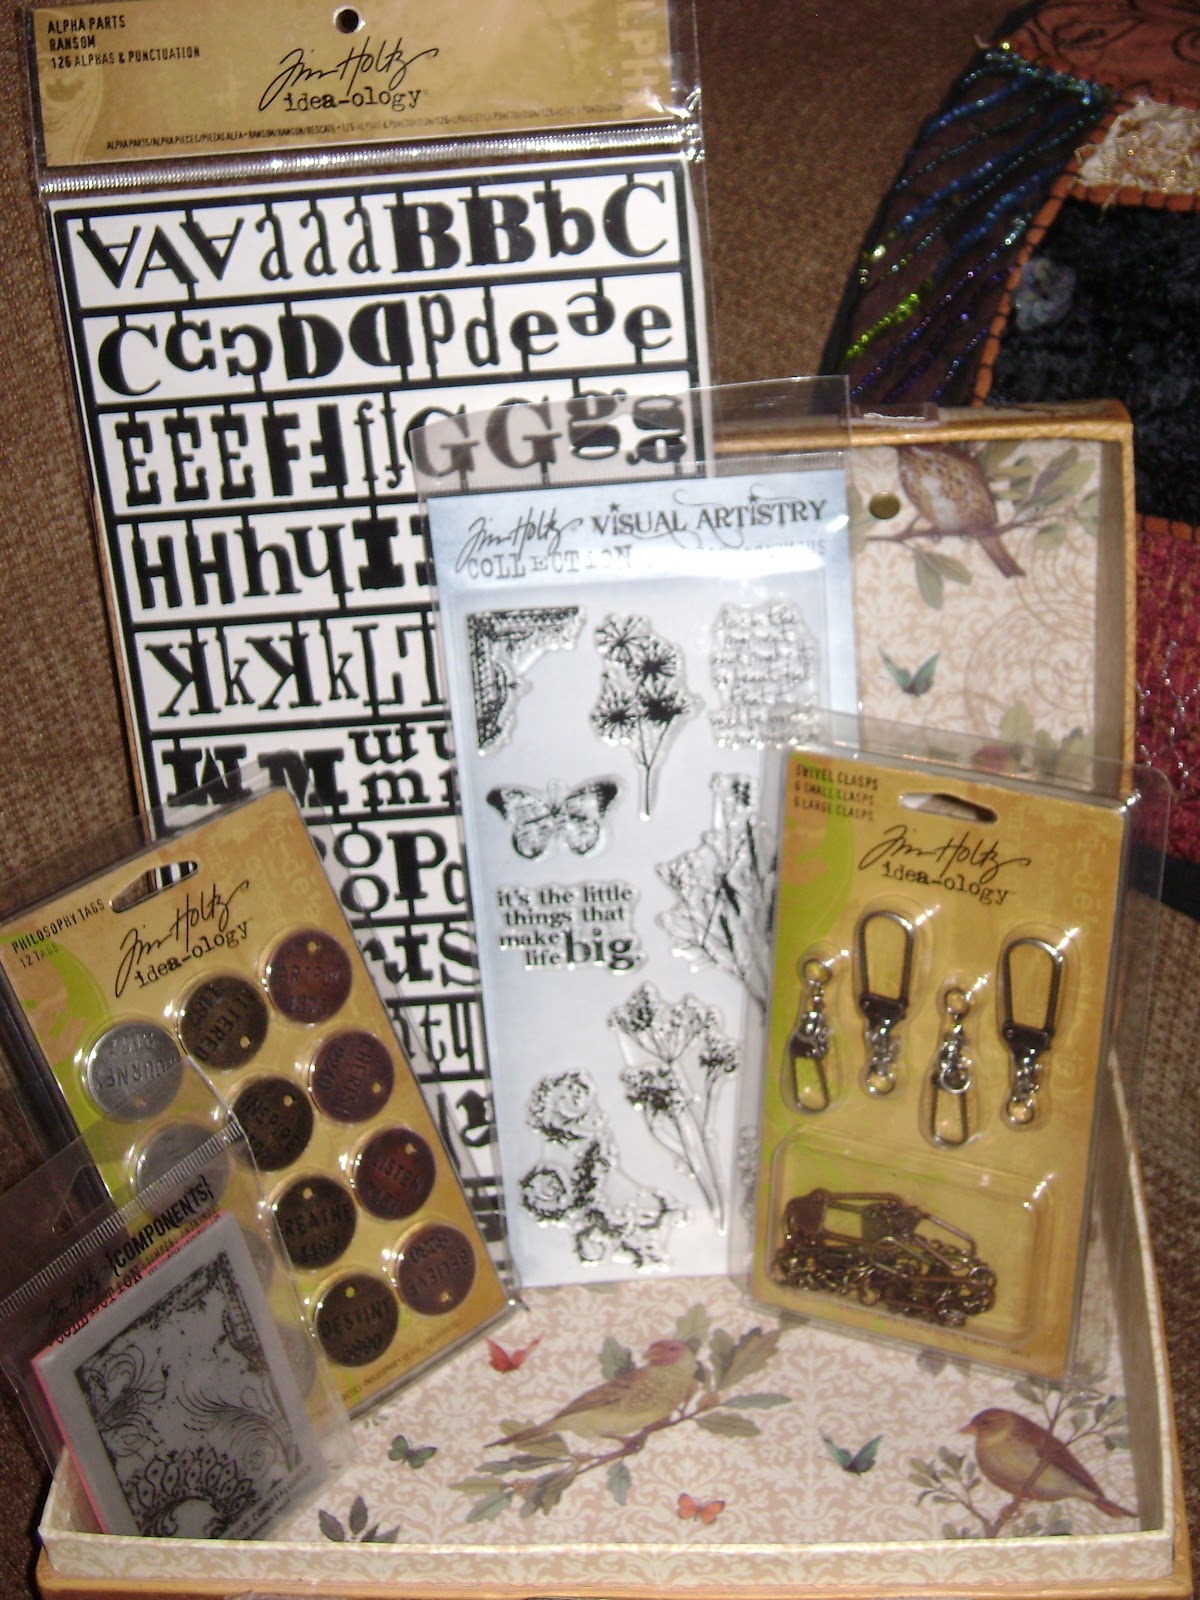
Here's what you will win:
A Tim Holtz prize pack worth $50
Good Luck to Everyone!  
I hope you enjoyed this technique week, and until tomorrow,
Happy Crafting!
ReNae


Thursday, March 15, 2012

Luck o' the Irish Day 4 & a New Technique! "Acrylic Resist!"

Hi Bloggers!
It is now Day 4 of the Luck O' the Irish Contest and Giveaway.  Yesterday's scrambled word was harder to figure out, by the nature of emails I received!  So, with a little hint we did have some correct guesses!
Whew!
I really want to give away these nice prizes, so put your thinking caps on for today's word too!
But before we get to the Scrambled Word of the day, first I have a really fun technique for you, and it's easy and really is a lovely way to doll up a card.  It's called "Acrylic Resist".  I learned this technique from a tutorial by Shelly Kuck.  This technique by Shelly was featured in the Resources section of the Split Coast Stampers website  HERE!   She has been paper crafting for over 9 years and loves using vintage images and embellishments.  She also loves to experiment with different techniques.  This is one of them!

A beautiful card by Shelly Kuck using the Acrylic Resist Technique

Acrylic Card by Beate of Split Coast Stampers
(this image is copyrighted by SCC)
What is also so great about this particular technique is that we will use supplies we already have in our craft room, which are pictured below.  So let's get started, shall we?


  1. Distress Re-inkers (or any water-based re-inker)
  2. Mini misters (or small spray bottle)
  3. Perfect Pearls
  4. Acrylic Paint (like Paint Dabbers)  Note: if you use acrylic paint in a bottle without an applicator sponge,  you will need a way to dab the paint on to your stamp...
  5. Black Ink (oil based pigment ink such as VersaFine) ***
  6. Stamps (one for main image, and 2 or 3 others, depending on what look you want.)
  7. Paper Towels
  8. Blending tool or sponge for blending ink
  9. Embellishments of your choosing
     ***Any color of VersaFine will be suitable...it's YOUR project.  Black is what Shelly used for her card but Beate used a couple of colors for her card.  Watch the video by Beate from Split Coast Stampers (below) to see step-by-step directions!
You will really enjoy using this technique in your artwork and on card & scrapbook page backgrounds!
If you want to post your project to this blog post, I will install the software tomorrow so that you can.

NOW!  HERE IS TODAY'S SCRAMBLED WORD FOR THE CONTEST!
"DREPAA"
To win you must first sign up to be one of my "Creative Friends".  Go to the bottom of this blog, and click on "Join this site".  Then leave a comment and/or your answer unscrambling the word in the "Post a Comment"  box at the end of this post.
Make sure you check back every day this week.  
You  must leave a comment on all the posts this week to qualify.  If you forgot one day, I will give you a bonus word at the end of the week.  Everyone will have a chance to win!

Here's what you'll win:


  • one ATC sized Components stamp, 
  • one package of Philosophy Tags, 
  • one package of Alpha Parts Letters, in the Random font, 
  • one Visual Artistry clear stamp set from Stamper's Anonymous, and 
  • one package of Swivel Clasps, all from the Tim Holtz Idea-ology Line.
  • This could be YOURS!  Just add a comment and unscramble today's word!

    Happy Crafting!
    ReNae O'Crabtree Allen  

    Wednesday, March 14, 2012

    Luck o' the Irish Day 3

    Hello Bloggers!
    Today I want to share a really cool technique called Faux Embossing.  I learned about this technique from my good friend Elise Ann Durenberger an accomplished paper designer and artist.  Elise has been a designer for Graphic 45, Just us Girls, Buttons Galore & More, Want2Scrap, Wplus9, and countless others!  She is an artist, an inspiration, and better yet, a wonderful friend.

    Elise Durenberger made this beautiful card using Shamrocks for the Faux Embossing technique
    Isn't this a lovely card? Such a nice result without using an embossing folder!
    And JUGS Guest Designer Marisa made this card, using the same technique, using Butterflies!
    *You can learn more about Elise and Marisa and "Just Us Girls" at the following blog posting!*
    *******************************************************
    Here is a detailed tutorial for FAUX EMBOSSING  by Splitcoast Stampers. 
    (Just click the above and the tutorial will appear!)
    You select the shape you want to use and punch out as many images as you want to put on your card.  As you will learn in the tutorial (above), after sandwiching them between the card and some paper, and running them through the Big Shot, you get this beautiful result!

    ***NOW FOR THE THIRD SCRAMBLED WORD OF THE WEEK!***  
    "CRAKSMOSH" 

    To win you must first sign up to be one of my "Creative Friends".  Go to the bottom of this blog, and click on "Join this site".  The leave a comment and/or your answer unscrambling the word in the "Post a Comment"  box at the end of this post.
    Make sure you check back every day this week.  
    You  must leave a comment on all the posts this week to qualify.  If you forgot one day, I will give you a bonus word at the end of the week.  Everyone will have a chance to win!

    Here's what you'll win:

  • one ATC sized Components stamp, 
  • one package of Philosophy Tags, 
  • one package of Alpha Parts Letters, in the Random font, 
  • one Visual Artistry clear stamp set from Stamper's Anonymous, and 
  • one package of Swivel Clasps, all from the Tim Holtz Idea-ology Line.


  • Good Luck and Happy Crafting!
    ReNae


    Tuesday, March 13, 2012

    Diamond Fold Card

    Hi Bloggers!

    Tonight at the Scrapbook Page Stamp Club meeting I will be demonstrating how to make a "Diamond Fold" Card. Here are some examples of the card using two different paper collections.
    They are fun and easy to make!


    I am short on time today to make my own tutorial for the blog, so have posted a video done by Splitcoast Stampers' designer, Biatta.  She does a wonderful job of explaining the process.

    To view the video click here:
    Diamond Fold Video-Splitcoast Stampers

    Hope to see everyone this evening at 6:30 pm for the Stamp Club meeting.  Be thinking of what you want to do for the April meeting!  Thanks!

    Happy Crafting!
    ReNae

    Luck O' the Irish Day 2

    Hi Bloggers!
    Today is Day Two of the Luck O' the Irish Contest!  Here's how to win...
    First, sign up to be one of my CREATIVE FRIENDS! You can do this by scrolling down to the bottom of the entire page, and click on the "Join this site" button.  It's very easy to do.
    Next, Look for the scrambled word posted daily.
    (I will post one scrambled word each day here on Crabtree-Creations.) 
    All you have to do is unscramble the word and leave it in the "comments" section at the end of the post.  Hint:  All the words will have something to do with St. Patrick's Day.
    *You MUST leave your answer on the blog EACH DAY to qualify!*
    If you miss one day, you will still have a chance to win, as I will give one bonus word on Friday.  
    But to be safe, you should check in each day!  
    I will be posting some fun ideas for St. Patrick's Day cards and projects, so it should be lots of fun!
    Here is today's word:
    OBAWRIN
    (to leave a comment, click on the word "comment" below, and the comment form will appear)

    Winner of the contest will receive:
  • one ATC sized Components stamp, 
  • one package of Philosophy Tags, 
  • one package of Alpha Parts Letters, in the Random font, 
  • one Visual Artistry clear stamp set from Stamper's Anonymous, and 
  • one package of Swivel Clasps, all from the Tim Holtz Idea-ology Line.

  • Check in tomorrow for the next scrambled word and later today for a cool project!
    Happy Crafting!
    ~ReNae 

    Monday, March 12, 2012

    Do you have the Luck O' the Irish? Let's see...

    Hi Bloggers!
    Today I am announcing a brand new contest!  Also, at the end of this post I have attached coupons to all your favorite stores!  If you're like me, you buy a lot of craft supplies, and a coupon is always helpful when making a purchase on a big ticket item!  I have "hot-linked" the coupons so all you have to do is click on the store's name and the coupon will appear.  Check to make sure the coupon is still valid, as these are the most recent I could find, but they do have expiration dates.  I'll try to do this every Monday for you.  Okay so on with the contest...

    St. Patrick's Day is fast approaching, so to celebrate I have decided to have a contest, and the prize for winning is a Prize Package worth $50.  Everyone loves the Tim Holtz Idea-ology line, so that is what I selected for the winner!  You will receive: 
    • one ATC sized Components stamp, 
    • one package of Philosophy Tags, 
    • one package of Alpha Parts Letters, in the Random font, 
    • one Visual Artistry clear stamp set from Stamper's Anonymous, and 
    • one package of Swivel Clasps, all from the Tim Holtz Idea-ology Line.

    Here's how to win...
    First, sign up to be one of my CREATIVE FRIENDS! You can do this by scrolling down to the bottom of the entire page, and click on the "Join this site" button.  It's very easy to do.
    Next, Look for the scrambled word posted daily.
    (I will post one scrambled word each day here on Crabtree-Creations.) 
    All you have to do is unscramble the word and leave it in the "comments" section at the end of the post.  Hint:  All the words will have something to do with St. Patrick's Day.
    *You MUST leave your answer on the blog EACH DAY to qualify!*
    If you miss one day, you will still have a chance to win, as I will give one bonus word on Friday.  
    But to be safe, you should check in each day!  
    I will be posting some fun ideas for St. Patrick's Day cards and projects, so it should be lots of fun!


    HERE IS MONDAY'S WORD.  
    UNSCRAMBLE IT AND POST TO THE COMMENTS FORM!
    (to leave a comment, click on the word "comment" below, and the comment form will appear)
    H E U L P E R N CA
    Check in tomorrow for the next scrambled word, and a cool card project perfect for St. Patty's Day!
    Coupons are posted below.  Please have fun and have a great day!
    Happy Crafting!
    ~ReNae O'Crabtree Allen

    Scrapbook Page Coupon               Creative-Coldsnow's Coupon             Michael's Coupon    
    Hobby Lobby Coupon                   Ink Paper Rubber Coupon                  Archiver's Coupon   


    We have a WINNER and a NEW CONTEST!

    Hi Bloggers!
    First of all THANK YOU for all your great ideas on organizing my craft room!  I had a very difficult time picking one that was my favorite, so I decided to use the Random.org Generator for my pick.

    DONNA WOOD,  said: "One of my favorite things to do is to keep all my stamping magazines together by year in a plastic basket and nest them chronologically. 
    When I get a new magazine, I grab a pen and 3X5 card making notes as I read cover to cover. 
    The 3X5 has the magazine name, issue(April/May or Fall or whatever) and the year on the narrow end. I list in a column each note with the page number before it so it is easy to find the technique or card or point of interest on that page.(example- a good man card or fold technique/kids card, or blue/green theme) When finished, I keep the 3X5 IN that magazine and the magazine is on the top until the next issue. When the year is finished then I start a new basket. If memory doesn't serve, it is in writing for me to find quickly when searching for something specific or just an idea for kids card etc. 
    I include all magazines of the same year if I get one that isn't in my subscription. You could also have duplicate 3X5's in a storage box, just to check for ideas, but it IS FUN to review the magazines when looking. ~ Donna Wood"


    CONGRATULATIONS DONNA!  You are the winner of a Hero Arts Polymer card set!
    Please email me your mailing address or other way to contact you and I will see to it that you get your prize!  And thanks to everyone for playing!  I had so much fun that I decided to do it again!
    I will be announcing a NEW CONTEST that starts Monday March 12th. There will be a clue given every day for 5 days, and on Friday the 16th of March a winner will be chosen! The prize for this contest is a Tim Holtz prize pack worth over $50! (see below)  See you Monday for the first clue!
    Tim Holtz prize package including an ATC size COMPONENTS  stamp,   a package of Philosophy Tags,  Alpha Parts (Ransom), a Visual Artistry stamp setfrom  (Stamper's Anonymous), and Swivel Clasps, all from Tim's  Ideo-ology Line.


    Be sure to check back soon for a chance to win these great products from Tim Holtz!
    To leave a comment, click on the word "comments" below and it will open the comment form.


    Happy Crafting!
    ReNae